Understanding Sewage Ejector Pumps
Why Gravity Isn’t Always Enough
Basement fixtures often sit lower than the main sewer line in Florida homes. When pipes cannot slope downward, wastewater stalls and creates unpleasant odors or backups. I recommend installing a sewage ejector pump to raise the waste to gravity flow. This lift allows homeowners to add bathrooms, laundry sinks, or bar areas without heavy excavation. Local building codes support the approach because it keeps the sanitary system fully enclosed.
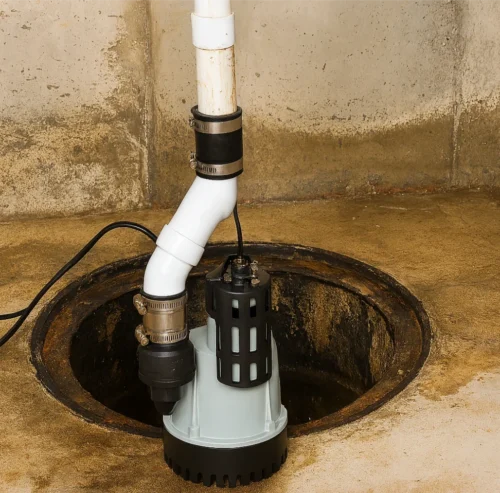
Core Components Inside a Pump Basin
A sealed basin forms the heart of every ejector system, keeping gases contained below the slab. Inside that chamber, an oil-filled motor spins a rugged impeller capable of passing two-inch solids. A tethered float switch senses water levels and triggers the motor at the proper height. Above the lid, a vent line carries methane safely outdoors while balancing internal pressure. A full-port check valve on the discharge riser stops backflow once pumping stops.
Typical Residential and Commercial Use Cases
Homeowners often choose ejector pumps when finishing basements for extra living space. Restaurants rely on larger units to handle dish-room drains installed in repurposed storage areas. Municipal lift stations sometimes use scaled-up versions to move waste from low-lying neighborhoods. Rural properties with septic tanks benefit because the pump lifts effluent without trenching deeper lines. Vacation cabins also adopt compact models to meet plumbing codes on sloped terrain.
Selecting the Right Pump Package
Calculating Flow Rate and Total Dynamic Head
Accurate sizing begins with counting connected fixtures and converting that list to peak gallons per minute. Measure the vertical distance from basin floor to gravity tie-in, then add friction losses through elbows and pipe runs. The sum yields total dynamic head, the key number on every pump curve. Choose a model whose optimal operating point lands near the middle of its performance chart. Correct sizing prevents short cycles that overheat motors and waste electricity.
Solids-Handling vs. Grinder Models
Standard ejector pumps use vortex impellers that move solids up to two inches in diameter. Grinder pumps shred waste into a fine slurry, allowing narrower discharge piping through tight spaces. Those cutting blades raise noise levels slightly and draw more power, yet simplify retrofits in crowded walls. Consider a grinder when the discharge must run long horizontal distances or climb steep vertical rises. For typical basement bathrooms, a solids-handling pump serves perfectly well.
Basin Volume, Material, and Cover Options
Larger basins slow cycling because they hold more wastewater between pump starts. Polyethylene chambers resist corrosion and install quickly, while fiberglass versions withstand higher groundwater pressure. Steel lids with neoprene gaskets support finished flooring and quiet operation. Clear inspection ports help you check levels without unbolting the entire cover. Always select a basin rated for sewage, not merely graywater, to handle toilet solids safely.
Discharge and Vent Sizing to Meet Code
Most jurisdictions call for two-inch discharge pipe whenever toilet waste enters the basin. Install the check valve within a few inches of the lid to limit backflow volume. Vent diameters must equal or exceed the discharge size to ensure proper airflow. Some areas permit air-admittance valves for graywater only, never for raw sewage. Reviewing local amendments before purchasing materials saves return trips to the supply house.
Pre-Installation Planning
Basin Placement and Pit Excavation Considerations
Position the pit clear of footings to avoid compromising structural support. Mark utility lines, then saw-cut the slab carefully to protect embedded rebar. Dig the hole several inches wider than the basin and fill the bottom with compacted pea gravel. Maintain a level stone pad so the chamber sits plumb and stable. Wrap exterior walls with filter fabric when surrounding soil contains sand that could wash in.
Electrical Service, GFCI Protection, and Alarms
A dedicated 20-amp circuit supplies consistent power and keeps nuisance trips off other loads. Install a weather-resistant GFCI receptacle above the lid for quick servicing. High-water alarms with audible buzzers and flashing lights alert occupants before overflow occurs. Many homeowners add cellular modules to receive pump alerts while traveling. Label the breaker clearly so family members disconnect power safely during maintenance.
Permit, Inspection, and Code Compliance Checklist
Local plumbing departments require detailed drawings showing basin location, vent paths, and discharge elevations. Submit manufacturer cut sheets highlighting motor horsepower and impeller clearance. Inspectors visit after rough piping but before concrete pour, ensuring vent and discharge sizes match the plan. A final inspection verifies electrical bonding, alarm function, and watertight lid seals. Keep signed approval forms with home records for future real-estate disclosures.
Hands-On Installation Workflow
Setting the Basin and Sealing Against Hydrostatic Pressure
Lower the chamber gently into the excavated pit, confirming it rests level on the gravel bed. Backfill evenly around the walls, tamping in lifts to avoid distorting the shell. Torque lid bolts in a star pattern so the gasket seats uniformly. Hydraulic cement seals any exterior penetrations where conduit or pipe passes through concrete. Detect leaks early rather than patching them later behind finished walls.
Assembling Discharge Piping, Check Valve, and Shut-Off Valve
Prime and glue PVC joints with solvent that matches pipe schedule and temperature rating. Orient the check valve arrow toward the building drain and support the riser with clevis hangers. A ball valve placed just above the check valve lets you isolate the pump for service. Test the assembly by filling the basin and watching water rise smoothly through transparent pipe. Address any seeping joints before they become hidden faults.
Vent Stack Tie-In and Odor Control Measures
Run the vent pipe vertically until it clears the highest flood rim of connected fixtures. Slope horizontal vents one-quarter inch per foot toward the stack to drain condensate. Tie into the existing vent using a wye fitting and 45-degree elbow to minimize turbulence. Where roof access proves difficult, charcoal vent filters offer an interim odor solution. Seal framing penetrations with fire-rated caulk to maintain envelope integrity.
Startup Tests: Float Adjustment, Backflow Check, System Flush
Fill the pit with clean water until the float engages the pump and note run time. After the motor stops, listen for the check valve clapping shut without hammering. Adjust tether length if the pump cycles too frequently or leaves excessive water behind. Flush all connected plumbing fixtures to confirm rapid clearing and smooth refills. Document settings in a maintenance log for future reference.
Routine Maintenance for Long Service Life
Quarterly Pit Inspection and Cleaning Steps
Shut off power at the breaker and remove the lid using stainless screws to prevent stripping. Hose basin walls lightly to wash away grease that may foul the float switch. Vacuum settled sand that abrades impeller blades over time. Inspect gasket integrity, then reinstall the cover and tighten bolts by hand before using a driver. Restore power and run a short cycle to verify everything operates quietly.
Float Switch Calibration and Replacement Intervals
Observe several cycles to ensure the motor starts at an eight-inch rise and stops four inches lower. A switch that sticks high invites backups, while one that sticks low overheats the motor. Replace mechanical floats every five years or sooner if debris repeatedly snags the tether. Always disconnect power before splicing leads and use waterproof heat-shrink connectors. Retest the alarm after installation to confirm proper wiring polarity.
Backup Power and Alarm System Verification
Inspect battery terminals monthly, cleaning corrosion with baking soda slurry if needed. Press the test button on the alarm to verify both light and buzzer remain functional. Simulate an outage by unplugging the pump and watching the inverter engage automatically. Replace batteries as soon as charge capacity drops below manufacturer recommendations. Record each test date on a panel sticker to maintain warranty compliance.
Troubleshooting and Repairs
Solving Short-Cycling and Overheating Issues
Frequent cycling often signals high inflow from foundation drains or misaligned floats. Check tether length first, then investigate for groundwater entering cracked walls. Motors drawing excessive amperage may have worn bearings causing heat and noise. Swapping the impeller and seal kit restores efficiency without replacing the entire pump. Upgrade basin volume if storm surges repeatedly exceed storage capacity.
Tracking Down Odor, Gas, and Vent Blockages
Persistent sewer smells usually trace back to dried floor drains or cracked vent piping. Pour water into traps weekly during dry seasons to maintain water seals. If odors linger, snake the vent from roof to basin to clear leaves or bird nests. Replace brittle ABS sections that permit methane seepage through hairline splits. Gasketed lids with stainless hardware maintain airtight seals longer in humid climates.
Clearing Clogs, Backflows, and Emergency Bypass Procedures
Foreign objects like wipes or dental floss wrap around impeller vanes and stall rotation. Kill power, isolate the valve, and remove debris with gloved hands—never chemical drain cleaners. If clogs persist, schedule professional drain cleaning before dismantling the pump assembly. Serious impeller damage warrants replacing the pump rather than rebuilding worn parts piecemeal. Schedule professional service when multiple fixtures refuse to drain despite cleared lines.
Cost, Value, and ROI Analysis
Typical Equipment and Labor Costs (Residential vs. Commercial)
Residential packages, including basin, pump, and permits, average between eight hundred and three thousand dollars. Commercial kitchens pay more for heavier motors and grease-resistant basins. Labor costs hinge on slab thickness, pipe routing complexity, and regional wage scales. Grinder systems add roughly twenty percent because of cutter assemblies and control panels. Over time, the investment proves economical by eliminating deep trench excavation.
Comparing Pump Installations to Gravity Drain Relocation
Lowering an entire sewer line requires extensive digging, structural shoring, and soil disposal fees. An ejector pump confines demolition to one compact pit and short pipe run. Homeowners avoid lengthy construction schedules that disrupt family routines. Business owners stay open because crews work in a single corner, not across the dining room. Less concrete removal also means reduced dust, noise, and post-cleanup expense.
Energy Usage, Lifespan, and Long-Term Savings
Properly sized pumps run only a few minutes daily, consuming minimal electricity. Annual operating costs often stay below ten dollars for typical households. With quarterly maintenance, motors frequently exceed fifteen years before replacement. Avoided grout repairs and blocked drains deliver additional savings through fewer emergency calls. Real-estate listings mention compliant pumps, increasing buyer confidence and property value.
The table estimates daily pump activity and annual electricity expense for typical household sizes using a ½-horsepower sewage ejector pump.
| Household Size | Estimated Inflow per Day (gallons) |
Pump Cycles per Day (avg.) |
Annual Electricity Use (kWh) |
Estimated Cost per Year (USD) |
Notes |
|---|---|---|---|---|---|
| 2 people | 90 – 110 | 8 – 10 | 28 – 35 | $4 – $6 | Low cycle count extends motor life |
| 4 people | 175 – 200 | 15 – 18 | 55 – 65 | $8 – $11 | Typical family usage pattern |
| 6 people | 260 – 300 | 22 – 26 | 80 – 95 | $12 – $16 | Consider upsizing basin to cut cycles |
Environmental and Health Considerations
Indoor Air Quality: Lid Gaskets and Methane Control
Airtight lids equipped with neoprene gaskets keep hydrogen sulfide and methane below the slab. Good ventilation routes gases high above the roof, dispersing them harmlessly into the breeze. Homeowners concerned about air quality can install monitors that log volatile concentrations. Regular gasket inspections prevent fatigue cracks that invite odors indoors. Maintaining proper seals protects respiratory health while preserving home resale value.
Compliance with Local Wastewater-Discharge Regulations
City ordinances classify ejector pumps as sanitary lift stations and outline material standards. Inspectors check for corrosion-resistant fasteners, correct vent sizing, and reliable backflow prevention. Some municipalities prohibit grinder effluent from entering combined storm sewers to protect treatment plants. Contractors provide documentation packets showing model numbers and certified pump curves. Passing inspections avoids fines and secures certificates of occupancy on schedule.
Integrating Ejector Pumps with Septic Systems
Discharge lines should enter the septic tank before the baffle to preserve settling zones. Flow rates must match tank capacity to prevent stirring solids into the drain field. An EPA fact sheet notes that pressure-sewer systems remain cost-effective in low-density or high-groundwater areas and add only modest electricity costs. Harsh cleaners can upset bacterial balance, so choose septic-safe soaps where possible. Annual inspections confirm the pump curve still meets system head after soil settling.
3 Practical Tips
Test the High-Water Alarm Every Quarter
Pour water into the pit until the float activates, triggering both buzzer and flashing light. Replace weak batteries immediately to ensure alerts function during storms. Note the test date on a sticker and set a calendar reminder for the next check. Quick drills build confidence so family members react calmly during genuine emergencies. Reliable alarms save thousands by preventing sewage damage to finished basements.
Keep a Spare Float Switch in Your Tool Kit
Store an identical float in a sealed bag near the electrical panel for fast replacement. Familiarize yourself with color-coded leads to avoid wiring mistakes under stress. Changing a failed switch quickly keeps toilets flushing during holiday gatherings. Disposed mercury switches require proper recycling rather than landfill dumping. Prepared homeowners avoid weekend plumbing surcharges by handling simple swaps themselves.
Remind Residents to Flush Only Pump-Safe Items
Place a discreet sign near toilets listing what belongs in the bowl: tissue and nothing else. Provide covered trash bins so guests resist the urge to flush wipes or hygiene products. Landlords should review the rule at lease signing and during annual inspections. Households that follow guidelines rarely face clog-related service calls. Clear communication safeguards equipment and keeps maintenance budgets low.
Frequently Asked Questions (FAQ)
How long can a well-maintained sewage ejector pump be expected to last?
Quality pumps often deliver dependable service for seven to ten years under average loads. Regular basin cleaning and float calibration extend lifespan toward fifteen years or more. Choosing a larger basin, which reduces daily cycles, lessens motor wear over time. Promptly replacing worn seals or bearings prevents cascading failures in adjacent components. Documented maintenance also supports warranty claims if unexpected defects appear.
Is venting absolutely required, or can I use an air-admittance valve?
Plumbing codes typically demand a dedicated vent pipe for systems handling toilet waste. Air-admittance valves admit air but never release pressurized gases, so methane may linger. Local inspectors rarely approve valves as permanent solutions for sewage ejectors. A full vent stack protects indoor air quality and simplifies future remodel permits. When in doubt, consult the authority having jurisdiction before closing walls.
What size solids can most residential pumps safely pass?
Residential ejectors designed for toilets usually pass spherical solids up to two inches wide. That clearance handles typical waste and standard single-ply tissue without issues. Non-flushable items like wipes exceed this size or snag on impeller vanes, creating jams. Reading manufacturer literature confirms each model’s capacity before finalising your purchase. Proper sizing prevents clogged discharges and costly emergency repairs.
How should I winterize an ejector pump system in an unheated basement or cabin?
Begin by shutting off water supply lines and draining fixture traps completely. Run the pump until the basin empties, then disconnect electrical power at the breaker. Pour a gallon of non-toxic antifreeze into the pit to protect residual moisture. Insulate exposed vent and discharge lines above grade to keep ice from forming. Finally, leave printed restart instructions inside the electrical panel for the spring opening.
Key Takeaways and Next Steps
Design Decisions That Prevent Future Failures
Sizing pumps correctly, selecting gasketed basins, and installing isolation valves ensure smooth operation from day one. High-water alarms combined with backup power give homeowners early warnings and added resilience. Choosing code-approved materials prevents fines while preserving system warranties. Solid planning limits surprises during inspections and future renovations. Well-designed systems save both money and frustration across the pump’s lifespan.
Maintenance Habits That Maximize Service Life
Quarterly cleaning removes grease that hampers float movement and shortens motor life. Routine alarm checks confirm batteries and buzzers remain dependable during heavy rainfall. Documenting every inspection helps spot trends before they become emergencies. Replacing minor parts promptly avoids larger, more expensive failures later. Consistent care rewards owners with decades of reliable basement plumbing.
When to Call a Licensed Professional
Persistent breaker trips, foul odors, or rising water despite normal cycling signal deeper problems. Certified plumbers possess specialized tools to replace seals or swap impellers without harming delicate wiring. Electricians handle motors drawing excessive amperage that threatens house wiring. Structural repairs may be necessary when groundwater undermines the pit, requiring engineering input. Experienced professionals restore safety and compliance, protecting both property and occupants.

- Addressing Low Water Pressure in Older Florida Homes: Diagnosis, Solutions, and When to Call a Plumber - December 11, 2025
- Chloramine in Lee County Water: Understanding Its Impact on Rubber Gaskets, Water Heater Elements, and Plumbing Lifespan. - December 4, 2025
- Plumbing Durability for SWFL Rental Properties: Choosing Fixtures and Systems That Withstand High-Occupancy Wear and Tear - November 25, 2025