Understanding Shower Relocation: What It Really Involves
Remodeling a bathroom often inspires clients to reposition the shower for better flow. I explain that moving a shower means adjusting water, drain, and ventilation systems simultaneously. The process reaches further than swapping tiles because pipes hide behind walls and beneath floors. Homeowners pursue relocation to gain extra space, improve accessibility, or install modern fixtures like rainfall heads. Every reason sounds simple yet each triggers important planning steps that protect safety, code, and budget.
Evaluating Feasibility Before You Start
Smart planning for any remodel plumbing project starts with a candid look at floorplan, framing, and pipe routes. I guide clients through measuring clearances, checking pipe access, and spotting load-bearing walls near the shower. Next, we confirm whether the move will disturb joists, electrical runs, or main vents hidden behind drywall. If potential hazards appear, we price reinforcements early so surprises never derail the budget midway. Clear feasibility studies save later demolition costs and reassure building inspectors that the plan meets local code. Such diligence also prevents costly change orders after materials arrive and timelines tighten.
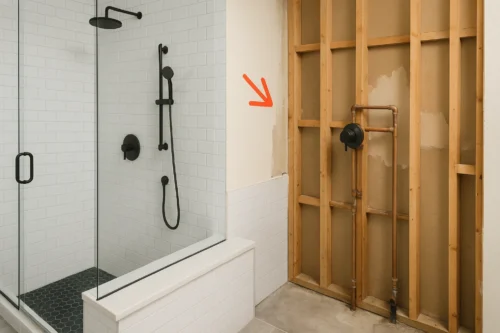
Plumbing System Impacts of a Shower Move
Any shower move reshapes the heart of the bathroom’s plumbing infrastructure. Supply lines, drains, and vents function together, so shifting one requires recalibrating the others for balance. I always map new routes on paper before opening the first wall, keeping water-flow diagrams handy. That visual plan clarifies material needs, minimizes elbows, and limits friction loss across the new distance. After documenting routes, I calculate pressure drop and drain slope to maintain reliable performance.
Water Supply Line Adjustments
Moving a shower means cutting into existing hot and cold lines before extending them toward the new wall. I prefer flexible PEX tubing because it threads smoothly through studs and reduces joint leaks. While you have walls open, consider switching to WaterSense-labeled showerheads that use no more than two gallons per minute and can save the average family 2,700 gallons annually. For copper systems, I sweat new fittings with lead-free solder and include dielectric unions at material transitions. Each extension maintains the original half-inch diameter, preserving flow and preventing noticeable pressure drops. Before closing walls, I run a pressure test that exposes leaks while repairs remain easy.
Pipe-Material Quick Guide for Shower Relocation
| Material | Key Advantages | Common Drawbacks | Typical Cost per ft (USD) |
|---|---|---|---|
| PEX | Flexible; fewer fittings; freeze-resistant; quick installs | UV-sensitive; requires approved crimp or expansion tools | $0.45 – $0.75 |
| Copper (Type L) | Long lifespan; bacteriostatic; high heat tolerance | Costly; prone to pinhole leaks in aggressive water; solder skill needed | $2.50 – $3.50 |
| CPVC | Inexpensive; easy solvent-weld joints; won’t corrode | Brittle when cold; smaller support spacing required | $0.60 – $0.90 |
| Galvanized Steel* | Strong; historically common in older homes | Rusts internally; heavy; difficult threading; often replaced, not reused | $2.00 – $3.00 |
*Often encountered during remodels; usually upgraded to PEX or copper for better flow and longevity.
Drainage and Venting Requirements
Drain lines demand careful slope, because even slight dips cause standing water and lingering odors. I set new two-inch PVC or ABS pipes with a minimum quarter-inch-per-foot slope toward the stack. When the relocation increases distance, I sometimes upsize to three inches to guarantee swift drainage. Proper venting follows close behind; without fresh air, traps siphon dry and allow sewer gas indoors. I tie the shower vent into the nearest vertical stack or run a new stud-bay vent that meets code. Final inspections include smoke tests, confirming seals hold and airflow remains unobstructed.
Subfloor vs Slab: How the Foundation Changes Everything
Foundations dictate relocation complexity more than any other single factor. Homes with crawl spaces or basements give plumbers generous workspace beneath the bathroom floor. Meanwhile, slab-on-grade construction forces us to break concrete, raising noise, dust, and labor hours. I help homeowners weigh these differences early so budgets reflect real conditions, not optimistic guesses. Choosing luxury finishes matters little if jackhammers already consume most allocated funds.
Working With Crawl Spaces and Basements
Accessible under-floor space lets my crew run supply lines without opening extensive sections of finished flooring. We drill precise holes through joists, always keeping standard bore allowances to protect structural strength. After routing pipes, we fasten them with rubber-lined clamps that prevent rattling when valves open. The raised floor also allows easy installation of new vent stacks that rise into the attic. Future repairs become simpler because plumbers can reach shut-offs and unions from below without tile removal.
Dealing With Concrete Slabs
Slab projects involve saw-cutting channels, which adds specialized labor and disposal fees. Before cutting, I contact utility-locating services to avoid damaging buried electrical or gas lines. We then score straight trenches, remove debris, and lay new drain and supply lines in sand beds. Once inspections pass, we pour high-strength patch concrete and re-establish the vapor barrier. Because slab cures slowly, clients should plan extra downtime before tile or shower-pan installation proceeds.
Layout & Distance: How Far Is Too Far to Move a Shower?
Distance drives both material cost and hydraulic performance when relocating a shower. I recommend limiting moves to six feet unless homeowners accept additional pressure-balancing measures. Longer runs require upsizing pipe diameters and adding support brackets every four feet to prevent sagging. Even moderate distances call for recalculating drain slope so water exits quickly without pooling. During design sessions, I overlay new fixture footprints on scale drawings, ensuring door swings remain comfortable. That holistic view protects functionality while confirming the relocation truly enhances daily use.
Building Code Compliance & Permit Requirements
Local plumbing codes exist to safeguard health, water quality, and structural soundness. I begin every project by reviewing code books for slope rules, vent sizing, and approved materials. Permits may feel bureaucratic, yet they offer homeowners proof that professional standards guide the work. Inspectors verify that drain traps sit within rough-in limits and that shut-offs remain accessible. Passing inspection allows insurers and future buyers to trust the remodeled bathroom without hesitation. Skipping permits can void warranties, raise fines, and complicate real-estate transactions later.
Structural Modifications You Might Face
Relocating a shower often forces carpenters to interact with framing members hidden beneath tile and drywall. We protect structural integrity by following engineering tables that limit hole sizes and notch depths. When moves intersect load-bearing walls, we install headers and jack studs that redirect weight safely. Open communication with building inspectors keeps reinforcement plans transparent and speeds approval. Careful framing also builds sturdy backing for new shower doors and grab bars.
Joist Drilling and Subfloor Reinforcement
Cutting through joists demands precision because over-sized holes weaken floor stiffness. I follow the rule that holes may not exceed one-third of joist height and must sit away from edges. When drains require larger openings, I sister joists on both sides, restoring strength with structural screws. Subfloor panels sometimes need replacement after cutting; I use tongue-and-groove plywood fastened with adhesive and screws. These details ensure the relocated shower feels solid underfoot and prevents future grout cracking.
Wall Framing Changes
Walls hiding supply lines may need new studs or blocking to support valves, niches, or grab rails. I layout stud openings carefully, allowing room for mixing valves while maintaining drywall fastening points. Access panels placed behind the valve wall provide future service without damaging tile. When new framing meets existing walls, I tie them together with metal plates, eliminating movement. That rigidity supports glass enclosures and shower doors, protecting seals from stress over time.
Waterproofing Essentials for a Moved Shower
Waterproofing ranks among the most important steps after plumbing routes change. I begin with a sloped mortar bed that directs water to the new drain correctly. Next, I apply a liquid membrane over seams and screws, forming a continuous moisture barrier. Fabric reinforcement bridges board joints, preventing movement cracks that compromise waterproofing. Before tile, I flood-test the pan for twenty-four hours, confirming no leaks appear.
Electrical and Ventilation Considerations
Relocation sometimes places the shower closer to existing electrical wiring than code permits. I inspect circuits and reroute cables outside the required clearance zone to prevent shock hazards. Ventilation also matters because warm steam now rises at a different room location. We reposition or upgrade the exhaust fan, ensuring it captures moisture quickly and vents outdoors. Such upgrades prevent mold growth and protect newly finished drywall from dampness.
Cost Factors: What Influences the Total Price Tag
Project budgets vary widely because many variables combine during a shower relocation. Understanding these variables empowers homeowners to allocate funds wisely and avoid sticker shock. I provide transparent line-item estimates, highlighting labor, materials, and contingency allowances. Homeowners spent $331 billion on improvements in 2021, with kitchen and bath projects topping thirty percent. Clients can then prioritize features that deliver the greatest daily benefit, like a larger showerhead. A clear breakdown also simplifies lender approvals when projects rely on renovation financing.
Basic Relocations vs Full Redesigns
Shifts within three feet often require only minor pipe extensions, keeping costs near the lower range. Such projects usually stay between five hundred and one thousand dollars for plumbing labor and supplies. Full bathroom redesigns that relocate multiple fixtures plus walls can triple that number quickly. Complex slab work adds saw-cutting teams and concrete patching, raising expenses further. These realities help homeowners decide whether smaller layout tweaks achieve similar comfort at lower cost.
Labor, Materials, and Hidden Costs
Labor makes up most of the budget because skilled tradespeople handle plumbing, framing, and tile. Material prices vary, yet upgraded valves, waterproof membranes, and decorative drains add quickly. Disposal fees for demolished tile or concrete often surprise clients unfamiliar with local landfill charges. Permit costs, engineering reports, and inspection re-visits also belong in the contingency line. Including a ten-percent buffer keeps the project moving even when unexpected hurdles arise.
DIY vs Hiring a Pro: Who Should Handle What?
Handy homeowners can perform light demolition and stud blocking if they follow safety guidelines. However, relocating drains, vents, and supply lines demands licensed expertise and professional tools. I encourage clients to leave pressurized water systems and solder connections to certified plumbers. Professional involvement protects warranties, satisfies code, and includes liability insurance. That peace of mind often outweighs modest savings from attempting complex tasks solo.
FAQ: Shower Relocation Essentials
How far can I move a shower before plumbing changes become expensive?
Small shifts under three feet usually involve straightforward pipe extensions and limited demolition. Costs climb quickly when you exceed six feet because additional elbows, supports, and vent lines appear. Longer runs may require larger pipe diameters to preserve water pressure and drain efficiency. Those upgrades, along with extra labor, often double plumbing expenses compared to a modest relocation. Consult a plumber early, because distance thresholds vary slightly with local codes and pipe materials.
Is it possible to relocate a shower on a concrete slab?
Yes, but slab work demands careful planning, specialized tools, and larger budgets. Contractors must saw-cut trenches through the slab, remove debris, and patch concrete afterward. Plumbers then bed new drain and supply lines in sand before restoring the vapor barrier. Inspections occur before pouring patch concrete, ensuring proper slope and secure pipe connections. The process lengthens remodel timelines, yet professional execution yields durable, code-compliant results.
Do I always need a permit to move a shower?
Most jurisdictions require permits when you alter plumbing drain or vent configurations. Permits trigger inspections that protect homeowners from leaks, structural damage, or unsafe installations. Some minor supply-line extensions inside the existing wall may fall under repair exemptions. I still advise clients to check with local departments because rules differ among counties. Securing permits ultimately safeguards resale value and preserves manufacturer warranties on new fixtures.
Can I reuse my old shower pan in a new location?
Reusing a pan rarely makes sense because removal often damages flanges or waterproof coatings. Even if intact, pans usually lack the correct drain alignment for the new layout. Manufacturers design pans for one installation, and warranties void once you detach them. A new pan ensures proper slope, fresh seals, and compatibility with updated waterproof membranes. Investing in a new base protects finishes and prevents leaks that ruin floors or ceilings below.
5 Practical Tips for a Smooth Shower Relocation
- Mark wall and floor penetrations with painter’s tape before demolition begins, reducing accidental overcuts.
- Snap progress photos of open walls to document pipe paths and shut-off locations for future repairs.
- Install clear access panels behind valves, allowing maintenance without damaging finished tile.
- Keep spare tiles and grout from the project in a labeled box for quick patch jobs later.
- Finally, schedule a follow-up inspection six months after completion to confirm seals remain watertight.
Signs That a Shower Relocation Was Done Right
Balanced water temperature arrives quickly when valves open, indicating proper supply sizing. The drain clears without gurgling or hesitation, proving slope and venting calculations succeeded. Tile joints stay crack-free because framing reinforcement supports movement loads effectively. Moisture meters read normal levels outside the shower footprint, confirming waterproofing integrity. Finally, access panels open easily, and no signs of corrosion appear inside.
When Moving the Shower Might Not Be Worth It
Sometimes budgets stretch thin after accounting for slab work, permits, and decorative finishes. If the move adds little functional space, I suggest simpler upgrades like swapping showerheads or doors. Owners can also rotate the shower orientation instead of relocating drains entirely. This compromise cuts labor yet still freshens the room’s flow and aesthetic. A professional consultation clarifies whether lifestyle benefits justify the extra construction cost.
Planning Ahead: What to Expect After the Move
Newly installed systems settle during the first months as pipes adjust to temperature changes. I advise clients to inspect caulk lines monthly and reseal any hairline gaps immediately. Running the exhaust fan after every shower prevents humidity buildup and preserves grout integrity. Homeowners should watch water bills for unexpected spikes, which could signal hidden leaks. Annual plumbing check-ups ensure valves operate smoothly and drains remain clear. Scheduling professional drain cleaning each year keeps the relocated shower draining swiftly and odor-free. These proactive habits protect the investment and extend the life of new finishes.
Wrapping Up: Making the Right Move for Your Bathroom
Relocating a shower transforms bathroom flow, yet success depends on detailed planning and skilled execution. Early feasibility checks, clear budgets, and code compliance protect homeowners from costly surprises. Choosing experienced professionals guarantees strong framing, leak-free plumbing, and enduring waterproofing. With those pillars in place, the new shower delivers comfort and value for years. If questions linger, reach out, and I’ll help weigh options tailored to your home.

- Addressing Low Water Pressure in Older Florida Homes: Diagnosis, Solutions, and When to Call a Plumber - December 11, 2025
- Chloramine in Lee County Water: Understanding Its Impact on Rubber Gaskets, Water Heater Elements, and Plumbing Lifespan. - December 4, 2025
- Plumbing Durability for SWFL Rental Properties: Choosing Fixtures and Systems That Withstand High-Occupancy Wear and Tear - November 25, 2025